Hello friends,
This week we return to the attack with one of the questions that arose in one of our photography workshops. What are the shooting modes on my DSLR camera and how do I get the most out of them? The question was more like, "Why does my camera have so many preset modes and what's the difference between them?" So let's summarize the modes step by step. shooting modes included in most models and how to get the most out of them.
The shooting modes available will depend on whether we have a compact, bridge, or reflex (DSLR) camera. Even the names each manufacturer gives to these modes can vary from one brand to another. I'm going to focus on the shooting modes available on most SLR cameras, but keep reading, because your camera may include many of these modes.
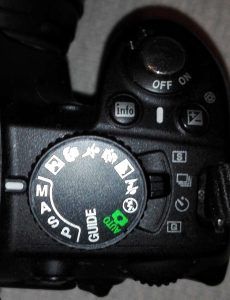 Although many professional photographers call them "shooting modes for dummies", automatic modes are used in some disciplines such as social photography or street photography and can save us from a tight spot. As their name suggests, they are predetermined modes in which the camera decides how to adjust the fundamental parameters (speed, aperture, and ISO) based on predefined mathematical equations depending on the scene we want to photograph. We just have to focus, frame and shoot.
We can distinguish between automatic mode and the so-called preconfigured or preset modes. scenesHere's an example of the modes included in my Nikon D3100.
Theoretically, the perfect shooting mode. The camera decides how to adjust the three basic parameters to achieve a correctly exposed photo. Neither burned out (overexposed) nor too dark (underexposed). Depending on the camera model, this mode may have the option to always shoot with the flash on, or with the flash off.
This mode is ideal if you don't want to rack your brains in normal situations. But what if you're photographing a scene with low light? Or a lot of movement? What if you want to play with the depth of field and blur the background to create a more interesting effect? Of course, automatic mode can be very useful, but there are other preconfigured modes that may be more appropriate in difficult situations.
One of the preconfigured automatic modes. As its name suggests, this is the mode to choose if you want to take a portrait without the hassle of changing and testing the parameters. This mode comes with a preconfigured f-value (to blur the background in front of the person or people in the portrait) and a shutter speed suitable for avoiding unwanted photos. blurred either trepidated if the person moves while we shoot.
This mode closes the maximum possible diaphragm (high f-number) to achieve a sharp and focused photograph in all focal planes, i.e. to enlarge the depth of field to the maximum. Obviously, this is the recommended mode for landscape photography. Depending on the light in the scene, the camera will also decide what shutter speed is best for properly exposing the photo. If there isn't enough light in the scene, the shutter speed will be so slow that we'll need to use a tripod.
They're basically the same program: the camera assumes that both children and athletes are going to drive us crazy with their speed (hyperactivity) and unpredictable movements. That's why it chooses a shutter speed high (fast) shutter speed, which will freeze the subject's movement. At the same time, depending on the ISO selected, it will decide which aperture is best for correctly exposing the photograph.
A very interesting mode if we want to take our first steps in macro or magnification photography. The camera opens the diaphragm to the maximum (low f-values) and chooses an appropriate exposure time or shutter speed so that, despite reducing the depth of field, the image is sharp at the point we decide. focus. In this program or scene mode it is highly recommended to use a tripod, since any involuntary movement and even our own pulse can result in a photo move that ruins our shot.
Or as in the case of the Nikon that I have taken as an example... "night portrait". More of the same. The camera assumes (because we tell it so by selecting this program) that we are in low light conditions. That's why it opens the diaphragm to the maximum and chooses an appropriate (rather long) exposure time, or in other words, a slow shutter speed. In this specific case, the camera will also increase the ISO sensitivity to properly expose in low-light conditions. Using this automatic mode may result in images with high noise, as the sensor is overloaded with light. In this mode, the fill flash may also be activated automatically, if your camera has one.
Our cameras may have more or fewer automatic modes or scenes than those mentioned, but as I told you, I have used an old Nikon D3100 as a template to give you these basic examples. What is my recommendation? Automatic modes can be useful when we don't have the time (or inclination) to modify and play with our camera's parameters. They can also be useful in those new situations, with unfamiliar lighting or movement conditions that require a quick response. But if you're really interested in progressing with your camera, understanding its limitations, and improving your photography technique, I recommend that you forget about these automatic shooting modes and focus on practicing with the following manual modes.
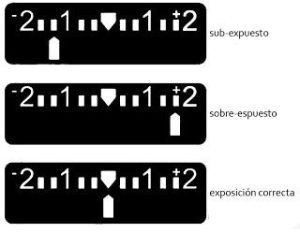 Possibly the most complex mode to master, but also the most rewarding. I shoot my photos in this mode with the 90%, as the camera allows me to modify the three fundamental parameters (ISO, shutter speed, and aperture), and once we get the hang of it, we'll forget about the headaches caused by the exposure meter. In this mode, after setting an ISO value and deciding the aperture and shutter speed parameters ourselves, the camera will inform us of the scene's exposure, that is, the light received by the sensor with those parameters. The image may be underexposed, overexposed, or have a value close to 0. In any case, it's up to us to decide whether to increase or decrease the shutter speed (or the f-value of the aperture) and whether we want an under- or overexposed photo.
A tip for sailors: just as in chemical and film photography it was recommended to expose for black and dark tones (underexpose a little) in digital photography it is recommended to overexpose (go to positive EV values) and to right the histogram. But don't worry about this topic because we'll cover it in another, more detailed article.
Not to be confused with the previous modes. This is the first of the three semi-automatic modes offered by DSLR cameras and is represented alongside manual mode by the letter P. In this mode, the camera decides the shutter speed and aperture values for us, but allows us to modify the ISO value and exposure compensation. And although it may be secondary, this mode also allows us to modify the white balance. It's a mode almost similar to the fully automatic mode.
Depending on whether we're talking about a Nikon or a Canon, the mode will be represented by the letter A or the letters A/V. This is another semi-automatic mode in which the camera gives us the freedom to choose the aperture value. Once that value is chosen, it automatically sets the shutter speed to properly expose the image. This is the mode recommended for landscape photography, since in this case, we are the ones who decide the f-stop value and, therefore, the depth of field we want in our image.
In semi-automatic mode (S (Nikon) or TV (Canon), the camera lets us decide the shutter speed (or exposure time). After we set this parameter, it automatically sets an aperture value so the photo is correctly exposed. This is the recommended mode for sports or action photography, as we decide the speed at which the shutter closes to freeze the image and prevent blur.
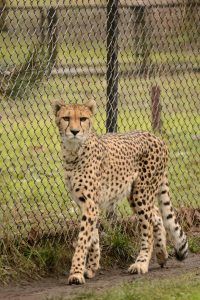 That of course depends on your capabilities, whether or not you are familiar with the possibilities and limits of your camera, and your tastes. From my personal experience and always speaking of the passions that Fotogario reflects, I always photograph in mode manual or I use one of two semi-automatic modes: shutter priority (for moving wildlife) or priority to opening (for landscapes).
This doesn't mean I reject preset modes and automatic mode or don't recommend them. I just don't use them. I know they're available, I know my camera has them, but I don't use them.
So instead of leaving you with a final recommendation on which shooting mode to use (and why can I only recommend one?), I'll leave you with three fundamental tips that will lay out the steps to follow if you're into the world of photography.
Friends, I hope you enjoy experimenting with your camera as much as I do. I wish you a happy weekend.